The following instructions, document the process that I toke to restore the HP 403B AC Voltmeter to working order.
Day 1
The unit was a bit dirty when USPS delivered it to my front door. The rechargeable battery pack is showing sign of corrosion.
First, I checked the meter movement and making sure that it is in good shape.
The moment is smooth and doesn’t appear to have any issue. With a 1.5V battery and a variable resistor, I checked the full-scale reading and a few other reading just to confirm the meter linearity.
A quick check of the voltage across the capacitor C21 and I am getting a steady 42.28V DC.
Next, I checked the battery +13, -6 and -13 supply voltage. I am getting +10, -6.5 and -13, this is because the battery is so old and some of the cell are dead and not evenly charged.
Even though the supply voltage are way off! The good sign is that the unit is fully working.
The battery is showing sign of corrosion and need to be replaced. So, it’s on my next to do list.
After a quick search, I found suitable replacement battery from eBay. The seller is trying to get rid of his inventory and selling a 25 packs of 3.6V 700mAh for cordless phone for only $0.99. The only catch is the $20.00 shipping.
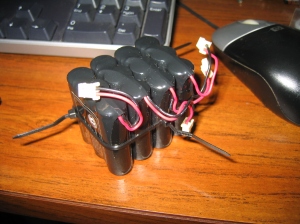
The meter originally came with 4 x 6.0V 225mAh Nickel-Cadmium Battery but I am going to replace it with 8 x 3.6V 700mAh battery packs made for cordless phone.
The combined voltage will be slightly higher when it is fully charged, however, it doesn’t seem to pose any problem after everything is re-calibrated.
After tying them together and solder their leads in series connection to make 2 x 14.4V batteries pack.
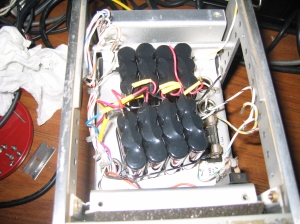
I reconnect and the battery to the original +13, -6 and -13 leads and put everything back together.
NOTE: Don’t solder the -13 lead just yet, as you will insert the amp-meter in series with it to adjust the charge rate later on.
I made some minor change to the orientation of these batteries after soldering them in place, so that the PCB will fit on top.
With the Amp meter connected in series with -13 power line, I adjust the pot to 6.5mA as suggested by the manufacturer. You may set it to 11mA, if you plan to use it on battery regularly.
I let it fully re-charge over night before I return to work on it again.
Day 2
As I am going over the calibration procedures.
I notice that when meter is on, it never quite return to zero. It is alway 2 ticks higher. Which kinda annoy me.
TODO: Investigate to find out which aging components causing this.
But for now, I just re-zero it with the zero adjustment screw. This will affect it accuracy a little bit. However, when checking the voltage indication on each range the reading track very closely to my HP 334A reading. So, for now it is not an issue for me at the moment.
The strange thing is that, on these HP AC Voltmeter. There is only mechanical zero adjustment. Unlike most VTVM that I had restored. Where you have to adjust mechanical zero, AC and DC zero.
Day 3
While calibrating, I notice that on 0.01 and 0.03 range. The meter doesn’t work at all and it’s alway peaking.
It seem the meter is fully deflected when those range are selected.
At first, I though some resistors in the voltage divider network are bad. But after checking these resistors, switches and signal path. Everything checked out ok.
So, to diagnose this further. I connected the oscilloscope to take a peek at the signal at each stages.
After tracing the signal path on the diagram, the original input signal is amplified and then going into the resistor divisor network.
When I connecting the probe and observe the output at R20 and R22, There is 11mV p-p (.048us or 21MHz) voltage showing on the scope.
In the 0.01 and 0.03 range, the original signal coming out of the voltage divider is so small compare that with the 11mV p-p noise.
The noise is swamping the original signal and causing significant meter reading error.
NOTE: According to the manufacturer manual, this may be caused by a noisy transistor and need replacing.
But first, I wanted to try to fix it by adding a filtering capacitors.
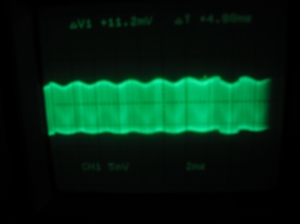
After adding a 0.1uF 50V to +13V and -13V to ground, this seem to eliminate the noise.
To install the capacitors, I find some open space on the PC board and solder them in place.
This help to remove the noise and making 0.01 and 0.03 range working again.
 As seen below the signal is much cleaner now.
Day 4
Spend a few hours calibrating the meter the best I can. Due to lack of a signal generator that can put out 30V 300kHz sine wave, I have to put off those calibration steps.
At the moment, the meter is track accurately from 1mV to 1V from 10Hz – 2MHz.
TODO:
- Recap
- Finish up calibration at 300kHz
Link to Service Manual:


You post very interesting articles here.
Your website deserves much more visitors.
It can go viral if you give it initial boost, i know very useful tool that can help you, just search in google: svetsern traffic tips
Great article. I just received my batteries a few days ago and getting ready to embark on my restoration as a winter project. Any “Lessons Learned” you care to share, let me know. Thanks again for the article.
I would avoid cleaning the Plexiglas, because the static build up will effect the meter linearity. HP uses quality components, however they are quite old. So, check all capacitors and their ESR reading and replace them as needed. Check for noise on + and – rails as well. Good luck!
I am also restoring a 403B and notice that the meter deflects so much on the most sensitive ranges when the covers are removed that it is impossible to do any calibration. Do others heve this problem?
Hi Floyd,
In the most sensitive setting, the AC hum or nearby body movement static charge can deflect the 403B. So, use BNC cable to connect the meter directly to a signal generator. Put the cover back after each adjustment and observe the reading. Or you can drill a small access hole to make the job easier.
In my case I use HP 651B as a signal generator to feed it to 50Ohm BNC at the 403B input. I use the HP 332A as indicator and calibrate the 403B to match the HP 332A reading.
The problem was that the fuse was burned out. Once I replaced it the unit functioned normally.
I replaced the batteries with 20 AA NiCads, each providing 1.2 volts. These were mounted in 4 snap-in trays, each capable of holding 5 NiCads.(the battery trays capable of holding 5 AA NiCads are available on eBay from China for about $1.00 each) Two trays were taped together to form two battery packs: a 12V battery pack and the remaining two trays were taped together to form a pack of two 6V batteries. These were connected to the red, black-white, blue and violet wired that previously connected to the original batteries. The two battery packs were taped together usins Scotch electrical tape which was also used to cover the exposed terminals of the two packs. These two packs easily fit into the 403B once the original batteries and their holder are removed. Cardboard pieces were used to hold the battery packs in place. This approach to battery replacement is easy and quick and allows the internal battery charger to be used without any changes.
I just removed the batteries from mine and built a voltage divider – to get the -6V. I like it much better without having to worry about overcharging batteries since I am always leaving it plugged in.
That is a great idea for a permanent bench top setup. I have though doing the same thing.
Hei venner, jeg trenger servicehåndboken til denne sjeldne juvelen, hvor jeg kan få, hvis noen kan sende meg via e-post: tuliomoreira31@yahoo.com.br, tusen takk til alle!
Here is the link
Click to access HP-403B-Manual-SNprefix-403.pdf